About Cloud-BS
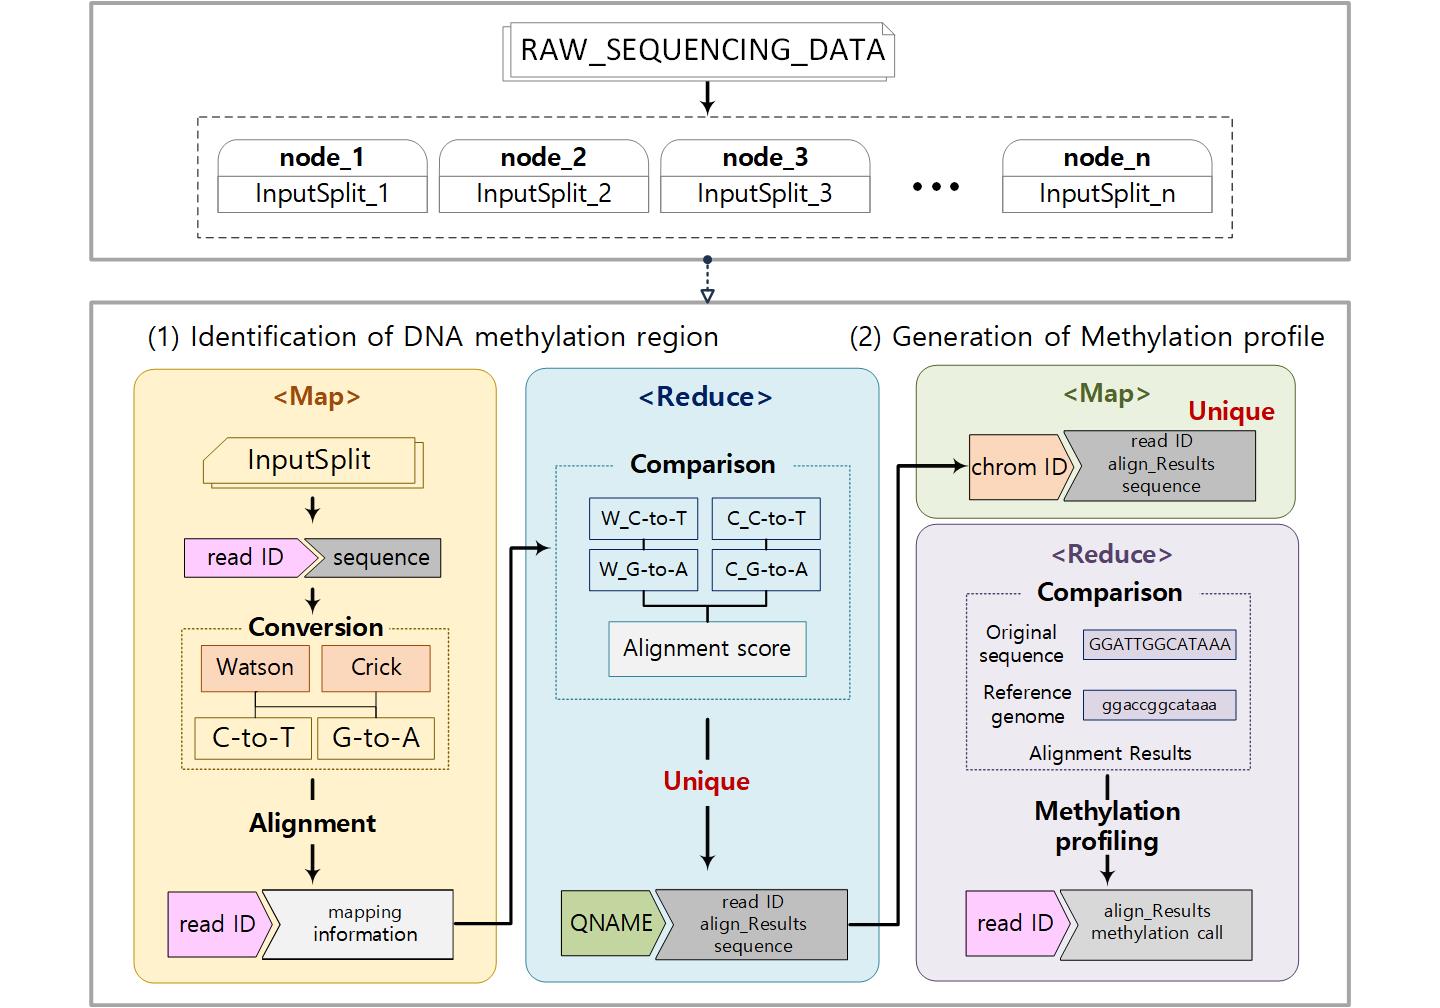
Cloud-BS is an efficient Bisulfite Sequencing aligner designed for parallel execution on a distributed environment. Utilizing Apache Hadoop framework, the Cloud-BS splits sequencing reads into multiple blocks and transfers to distributed nodes. By designing each aligning procedure into a separate map and reduce tasks while internal key-value structure is optimized based on MapReduce programming model, the algorithm significantly improved aligning performance without sacrificing mapping accuracy. In addition, Cloud-BS minimizes the innate burden on a configuration of a distributed environment by providing a pre-configured cloud image.
Installation
Cloud-BS is implemented on Apach Hadoop framework and utilize HDFS file system. For alignment we use Bowtie2, so that framework and programs should be prepared before executing Cloud-BS.
Requirements
- Apache Hadoop >= 2.7.3
- Bowtie2
Running Cloud-BS
Building Index
Usage
-
Move to “MRAlign/align_mapreduce/run/index/build_index”
-
Use run_build_index.sh to build an index for an reference genome. It builds an index from a reference genome fasta file. The script run_build_index.sh uses ~/chr1.fa file as a reference file but you may use build_index.py to convert your own reference file.
- Input : Reference genome fasta file path in HDFS directory
- Output : HDFS directory to save index built from reference genome
- log : Local log file path
- Use set_index.sh to distribute the index to all nodes.
- ref_path : HDFS directory which has index built from reference genome
- local_path : local directory to save index in all nodes
Alignment
Usage
-
Move to “MRAlign/align_mapreduce/run”
-
Use setFile.sh to put raw reads file in HDFS. It simply moves ~/simulated.fa file to fa_data/ directory in hdfs. If you wish to align other sequence such as the test dataset in the bottom of this document, move the bisulfite sequence to fa_data/ directory in hdfs by executing hdfs dfs -put <your bisulfite sequence file> fa_data/
-
Use run_align.sh to map the bisulfite reads
- OUTPUT_PATH : HDFS directory to save output sam file
- INPUT_DIR : HDFS path with input fasta file
- INPUT_FILE : Input fasta file
- REFERENCE_DIR : local directory which has index built from reference genome
- RESULT_FILE : Output sam file name which will be saved in local directory
- NUM_NODES : the number of nodes in Hadoop cluster to execute
Cloud-BS on Amazon cloud
Now on Amazon EC2, AMI image is available on region Ohio. Follow under this description step-by-step to deploy Cloud-BS by using AMI image.
-
Select the “Route 53” service and select “the hosted zones”.
-
Create hosted zone with name “mralign.internal.”, private hosted zone and vpc id of the us-east-2 (Ohio) region (vpc id depends on the user). Take a note of vpc id.
-
Select the ec2 service and select AMIs.
-
Select public images and for users who will use t2 series or m4 series, search [ami-0156391b5803ec91d]. Users who will user m5 or c5 series, search [ami-0a125ba12e5b67b98].
-
Launch ami with instances having more than 16GB memory. “Select Next: Configure instance Details”
-
Enter the number of instances that you want to launch. Make sure that the vpc id is the same as that you entered in the route 53 service.
-
Select “Next: Add Storage” Add an EBS storage with device name /dev/sdb and size more than 20 GB.
-
Select “Next: Add Tags”
-
Select “Next: Configure Security Group”
-
Add TCP Rules with port range 4000 - 55000 from source 0.0.0.0/0.
-
Select “review and launch” Launch the instances.
-
Select one instance as the master node and take note of private ip of the instance. For instance, 172.31.11.224.
-
Go back to the route 53 service and select hosted zones. Select “mralign.internal”. Create record set with name “master” and value “172.31.11.224”.
-
Connect to the master instance with its public ip and execute the start.sh and then connect to the other instances and execute the start.sh. You can ignore the warning “sudo: unable to resolve host ip-172-31-10-26”.
If you have launched instances with other series not written in above, then check your block device with “lsblk” command, and modify “xvdb” or “nvme1n1” part in “start.sh” with your block device name appropriate to your instances.
By using your web browser, connect “<public ip of the master node>:50070” and check every node is live. Then, open “<public ip of the master node>:8088” and check all nodes are live.
Contact
If you have any question or problem, please send an email to miniymay@sookmyung.ac.kr